Special Stitches
hdc2tog (half double crochet 2 stitches together) = [Yarn over, insert hook in next stitch, yarn over and pull up loop] 2 times, yarn over and draw through all 5 loops on hook.
join with sc = Place a slip knot on hook, insert hook in indicated stitch, yarn over and draw up a loop, yarn over and draw through both loops on hook.
Pattern
GRANNY SQUARE I (make 10)
With A, ch 5; join with slip st in first ch to form a ring.
Round 1 (right side): Ch 3 (counts as dc here and throughout), work 11 dc in ring; join with slip st in top of beginning ch- 3—12 dc. Fasten off.
Round 2: With right side facing, draw up a loop of E in any space between sts, ch 3, dc in same space, *ch 1, 2 dc in next space between sts; repeat from * around, ch 1; join wth slip st in top of beginning ch-3—24 dc and 12 ch-1 spaces. Fasten off.
Round 3: With right side facing, draw up a loop of F in any ch-1 space, ch 3, 2 dc in same ch-1 space, *ch 1, 3 dc in next ch-1 space; repeat from * around, ch 1; join with slip st in top of beginning ch- 3—36 dc and 12 ch-1 spaces. Fasten off.
Round 4: With right side facing, draw up a loop of C in any ch-1 space, ch 3, 2 dc in same ch-1 space, *ch 2, 3 dc in next ch-1 space; repeat from * around, ch 2; join with slip st in top of beginning ch- 3—36 dc and 12 ch-2 spaces. Fasten off.
Round 5: With right side facing, draw up a loop of B in any ch-2 space, ch 3, 3 dc in same ch-2 space, ch 1, 4 dc in next ch-2 space, *ch 1, (2 dc, 2 tr, ch 2, 2 tr, 2 dc) in next ch-2 space (corner made), [ch 1, 4 dc in next ch-2 space] twice; repeat from * 2 more times, ch 1, (2 dc, 2 tr, ch 2, 2 tr, 2 dc) in next ch-2 space, ch 1; join with slip st in top of beginning ch-3—4 corners with two 4-dc groups along each of 4 sides between corners. Fasten off.
Round 6: With right side facing, join A with slip st in any corner ch-2 space, *[skip next st, sc in next 3 sts, sc in next ch-1 space] 3 times, skip next st, sc in next 3 sts, 3 sc in corner ch-2 space; repeat from * 3 more times; join with slip st in first sc—72 sc (15 sc along each of 4 sides between 3-sc corners).
Do not fasten off.
Round 7: Continuing with A, ch 1, *sc in each st to next 3-sc corner, 2 sc in each of next 3 sc; repeat from * 3 more times; join with slip st in first sc—84 sc.
Fasten off.GRANNY SQUARE II (make 10)
Make same as Granny Square I using B for Round 1, F for Round 2, A for Round 3, E for Round 4, C for Round 5, and A for Rounds 6 and 7.GRANNY SQUARE III (make 10)
Make same as Granny Square I using C for Round 1, D for Round 2, E for Round 3, F for Round 4, B for Round 5, and A for Rounds 6 and 7.GRANNY SQUARE IV (make 10)
Make same as Granny Square I using D for Round 1, A for Round 2, B for Round 3, C for Round 4, F for Round 5, and A for Rounds 6 and 7.GRANNY SQUARE V (make 10)
Make same as Granny Square I using E for Round 1, B for Round 2, F for Round 3, A for Round 4, D for Round 5, and A for Rounds 6 and 7.GRANNY SQUARE VI (make 12)
Make same as Granny Square I using F for Round 1, C for Round 2, B for Round 3, D for Round 4, E for Round 5, and A for Rounds 6 and 7.
Finishing
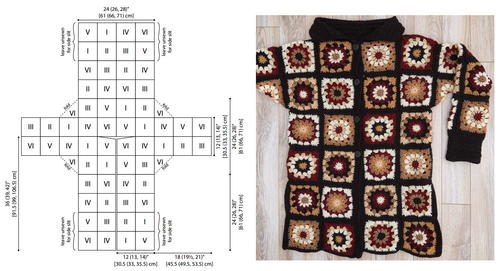
Arrange the Granny Squares as shown in assembly diagram. With A, sew the squares together. Take care when sewing the underarm/gusset squares in place. One square is placed under each arm and 2 edges of the underarm/ gusset square are sewn to edges of 2 squares in the sleeve and the other 2 edges of the underarm/gusset square are sewn to edges of 2 squares in the body of the coat. When sewing sides of coatigan, leave the last 2 side squares at the lower edge of the front and back unsewn for side slits.
Button Band
Row 1 (right side): With right side facing, join A with sc at beginning of left front edge, work sc evenly along the left front edge.
Row 2: Ch 1, turn, sc in each st across. Repeat Row 2 until button band measures about 1½” [4 cm]. Fasten offButtonhole Band
Row 1 (right side): With right side facing, join A with sc at beginning of right front edge, sc in each st to near top corner of first of upper four Granny Squares, [ch 3, sk next 3 sc (for buttonhole), sc in each st to near top corner of next Granny Square] 3 times, ch 3, sk next 3 sc, sc in each st to end of right front edge.
Row 2: Ch 1, turn, sc in each sc and ch across.
Row 3: Ch 1, turn, sc in each st across. Repeat Row 3 until buttonhole band measures about 1½” [4 cm]. Fasten off.Collar
Row 1 (right side): With right side facing, join A with sc at beginning of neck edge, work 79 more sc evenly spaced along neck edge—80 sc.
Row 2: Ch 2 (counts as hdc here and throughout), turn, hdc2tog, hdc in each st across—79 hdc. Repeat Row 2 until collar measures about 6″ [15 cm]. Fasten off.Sleeve Cuffs
Round 1 (right side): With right side facing and beginning under the arm, join A with sc in sleeve edge, work 39 more sc evenly spaced around edge; join with slip st in first sc—40 sc.
Round 2 (wrong side): Ch 2 (counts as first hdc here and throughout), turn, hdc in next sc, hdc2tog, *hdc in next 2 sc, hdc2tog; repeat from * around; join with slip st in top of beginning ch-2—30 hdc.
Round 3: Ch 2, hdc in each st around; join with slip st in top of beginning ch-2. Repeat Round 3 until cuff measures about 5″ [12.5 cm]. Fasten off. Repeat around other sleeve edge. Fold cuffs up.Lower Edging
With right side facing, join A with sc in lower front corner, sc evenly spaced along entire lower edge (including side slits), working 2 sc in each lower corner of side slits. Fasten off.
Sew buttons to button band, opposite buttonholes.
Weave in ends.Assembly Diagram